How to Handle Prisoners of War
QRF Infantry Tactics
Dealing with a POW is a risky business. You never can tell just what is in their head. Some will play along just so they can draw you closer. Others will be cool until you go to restrain them, then freak out.
This article is part of a series we are using to teach QRF Infantry Tactics. Here is an outline of the free lessons. They are numbered in the order they are taught in the printed book.
- How to Form Your Own Platoon
- How to Travel During Wartime Without Getting Ambushed
- Hand & Arm Signals - Communicate Silently
- Prisoners of War
- How to Remove the Injured From Battle
- Reaction to Contact (How to Respond if You Get Attacked)
- How to Stop an Armored Vehicle
- Convoys and Obstacles
- How to Identify, Locate and Avoid Landmines
- Fighting Back: How to Ambush Your Enemy
- Fighting Back: Tactical Formations
- Breaking Contact (How to Retreat)
- How to Conduct TCPs (Traffic Control Points)
- A Letter to the Commander (How to Keep Your Men Alive)
- A Story of Battle (What a Real Ambush Looks Like and How I Lived Through It)
Introduction - Prisoners of War
*Important Note* This is lesson 4 of our QRF Infantry Tactics series. Click here to read the article on lesson 1.
Below you will see a summery of the article, "How to Handle Prisoners of War" Each section is linked so that you can go straight to the topic you're interested in learning about. Use the "Back to Top" button on the bottom right to navigate back up to the article summery if you want to view a different topic. Or you can simply scroll up or down if you want to take the time to do so.
If you have any questions at all about the tactics or methods mentioned in this article, you can ask by either leaving a comment at the bottom of the article, sending us an email to prepare@tackleberrysolutions.com or you can even call Arthur directly at 919 - 223 - 7741.
Article Summery
How to Handle Prisoners of War
Video - How to Handle Prisoners of War
The Initial Search - Prisoners of War
Don’t take chances. When you come upon a “surrendering” enemy. Put them on the ground. If they are being difficult and act as if they don’t understand, inflict some pain. A good barrel thump to the face will help their communication skills suddenly improve.
*Important Note* Do not attempt to search or handcuff a POW when you are by yourself. You ALWAYS want a second guy to watch over you in the event your POW attempts to escape or fight back.
Step 1: Slam them to the ground and place their hands interlocked on the back of their heads.
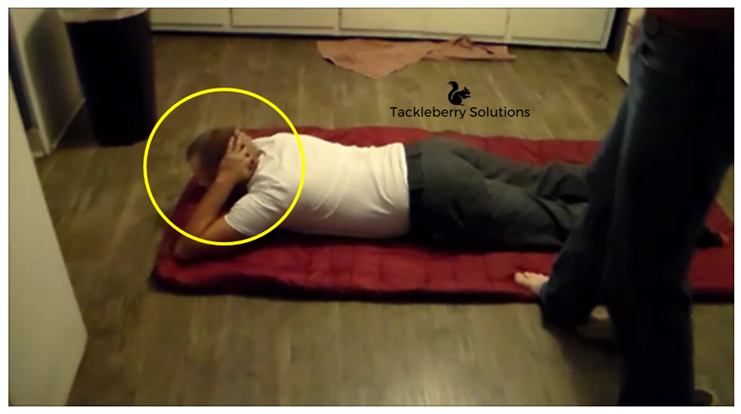
Place the ball of your foot on their hands (this prevents them from getting their hands lose and detonating a suicide vest or fighting you) and the heel of your same foot on their neck or shoulders. Put a little pressure on them. Just enough so they feel it. Don’t place all your weight there as it will cause serious damage and could throw you off balance if they decide to roll suddenly.
Place the barrel of your rifle to the side of their head. This lets them know that if they so much as breath heavy, you’re going to kill them.
*Important Note* This is war! Do not be afraid to shoot them. Going soft costs more lives.
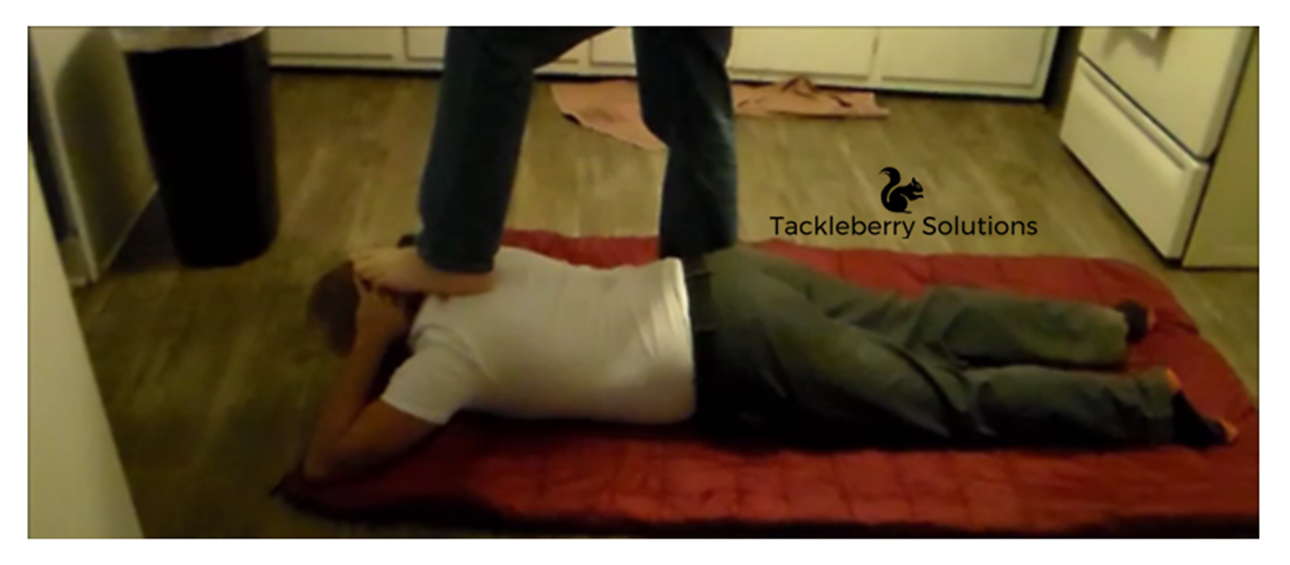
When you’re ready to search the POW, grab their interlocked fingers with one hand while you search them with the other.
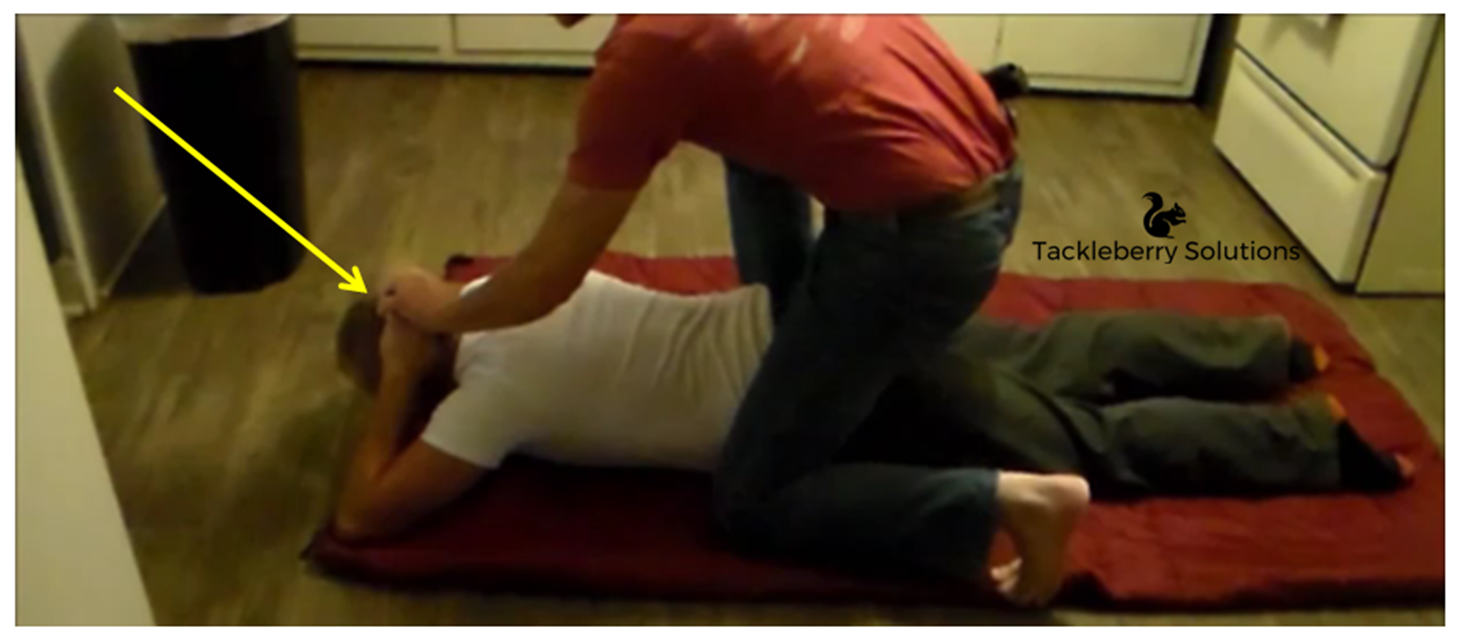
The first thing that you are going to do is touch their back. If they are wearing an S vest, you are going to feel it.
*Important Note* If you find an S vest, forget anything else and just shoot them in the back of the head. You DO NOT want to risk dealing with this guy. You never really know how they have it wired. A smart bomb maker will have their vest wired in such a way that it is made to detonate if removed. Sadly, this includes unwilling suicide bombers (You’ll never know if they are really unwilling and are just playing the victim to lure you in and remove the vest so that it detonates and gets more people.) This is the rules of war. You’ve got to risk killing an innocent person if it means saving more innocent people.
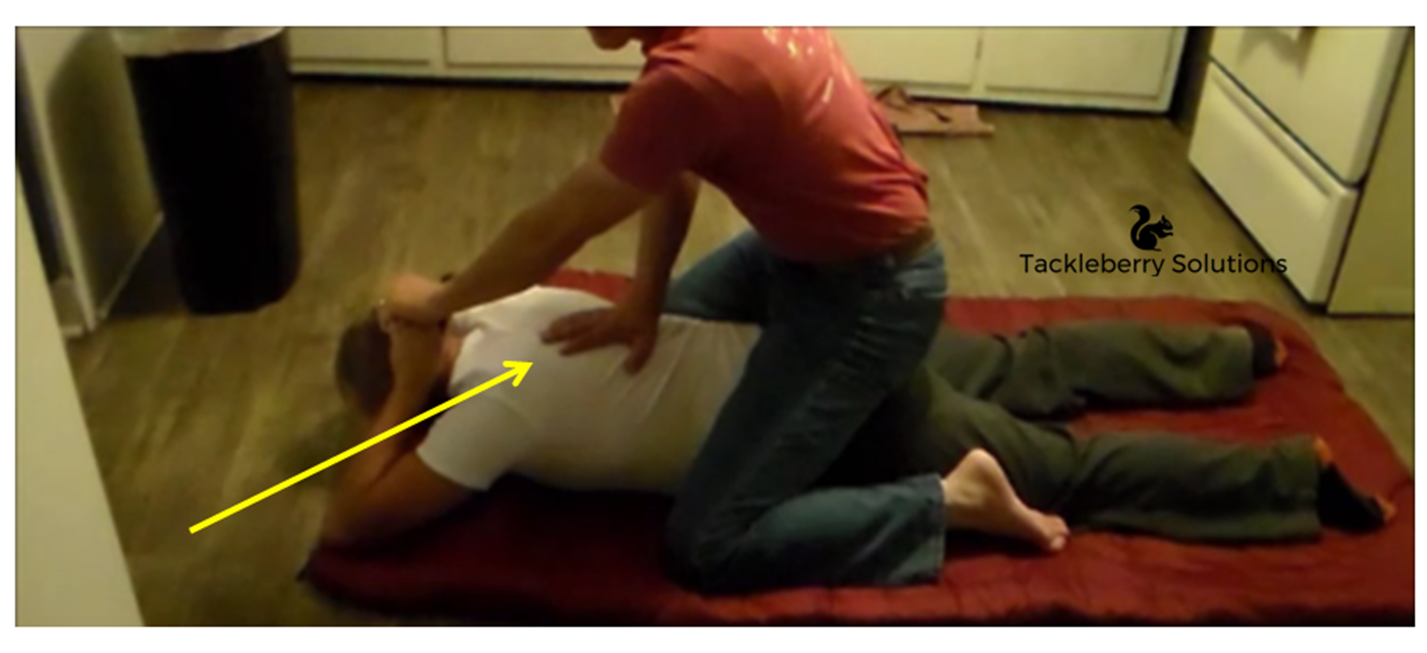
Next you’re going to check their sleeves (this applies more to long sleeves.) Look for wires, any kind of detonation switch and weapons.
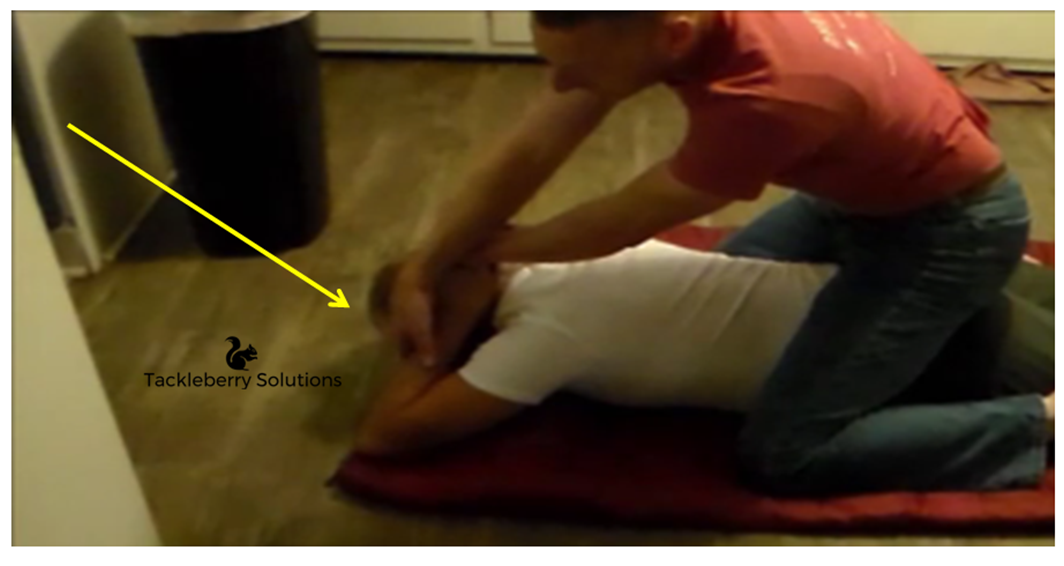
Then run your fingers around the collar of their shirt.
*Important Note*(Watch out for necklaces that may be attached to something else.) All head garb needs to be removed and thrown away from you.
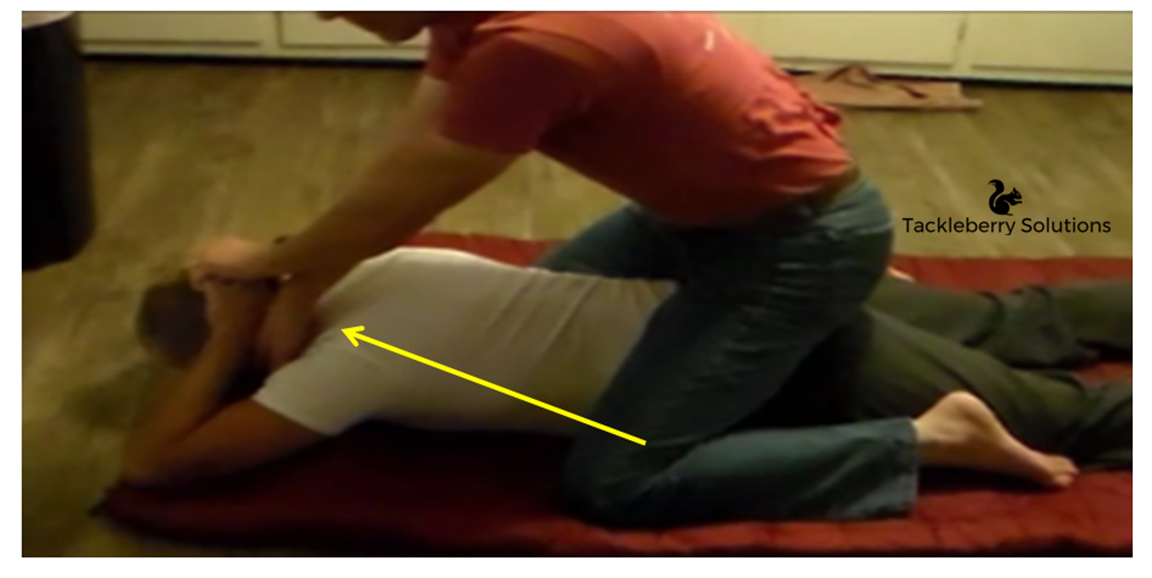
Now you’re going to check their armpits and sides.
*Important Note* This is another common place for weapons. I’ve pulled a pistol off a 15 year old kid in Iraq that he had tucked up under his arm.
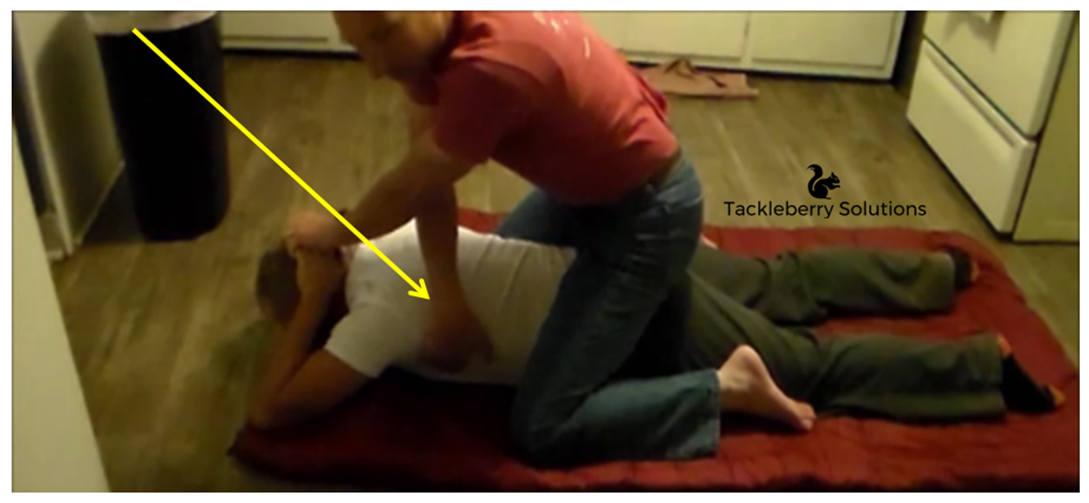
Work your way down their back and to their belt.
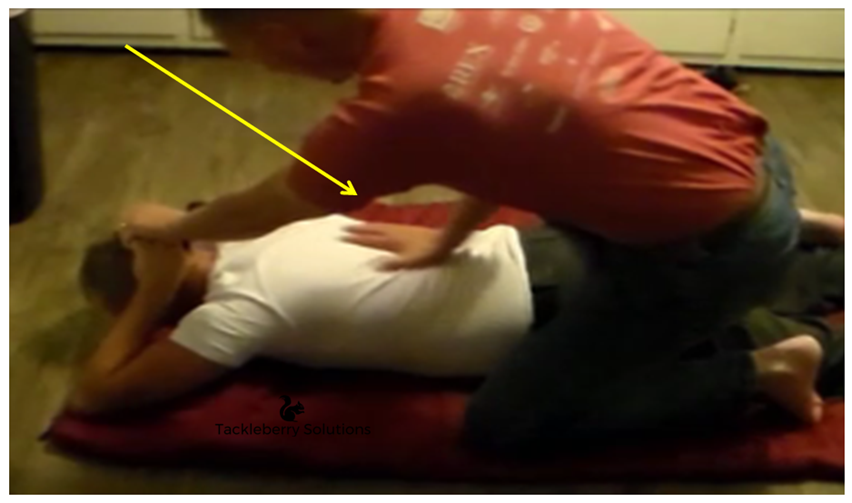
When you get to the belt, run your fingers all around the inside and outside of it to ensure that nothing is stowed there. Go back through and check in between the belt and the pants. (Yes this is nasty and unpleasant, but you want to be thorough when you search a POW, you don’t want to miss ANYTHING.
I encourage you to keep a set of plastic gloves on hand just for this purpose.) Also, some belts will have a zipper or hidden pocket - watch for those as well – if you do find something – take the belt off to search it.
*Reminder* This entire time you need to keep their hands secured – do not lighten your grip!
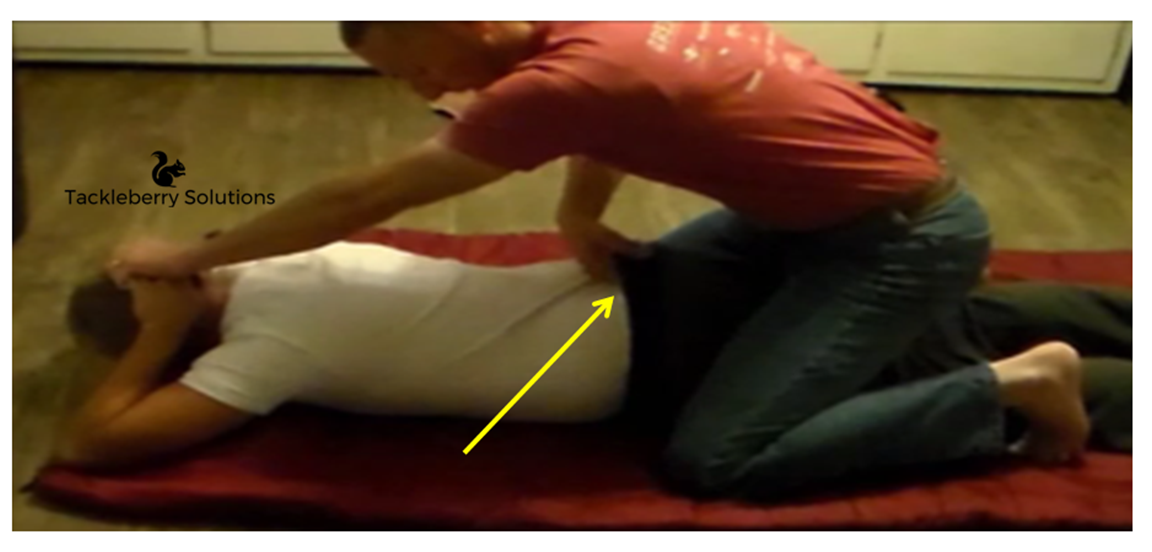
Now take your knee and place it in the center of their back to keep them from rolling away while your search their butt and legs.
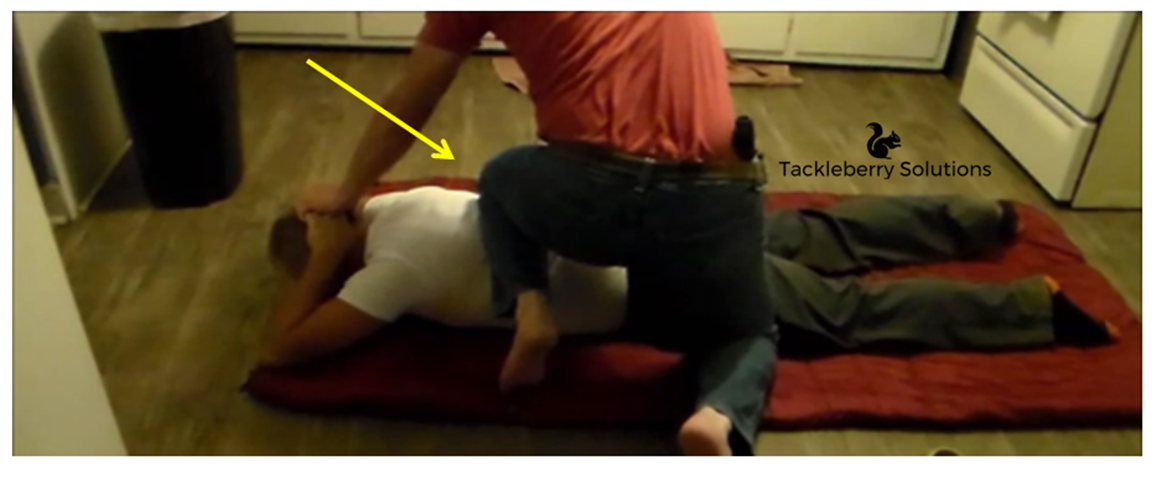
Work your way down the butt and legs feeling for anything out of the ordinary.
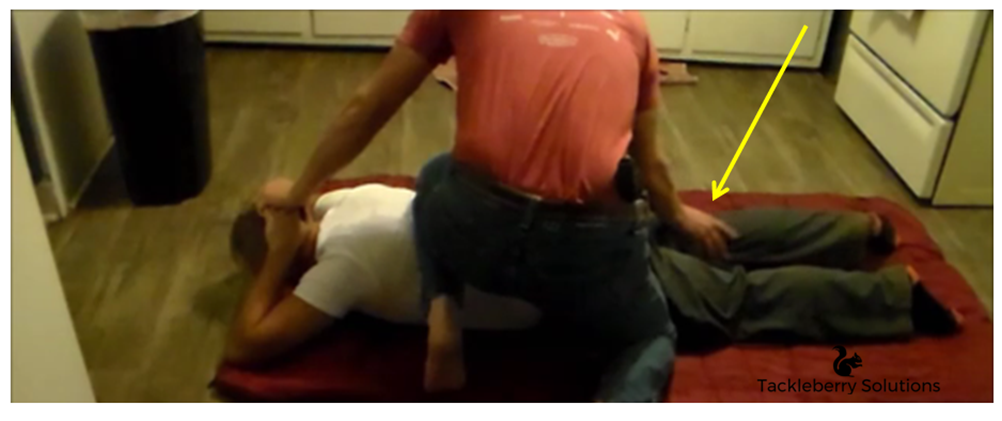
Grab their leg and search their calves around the inside of their pants and take off their shoes.
(It’s hard to run fast or far without shoes.)
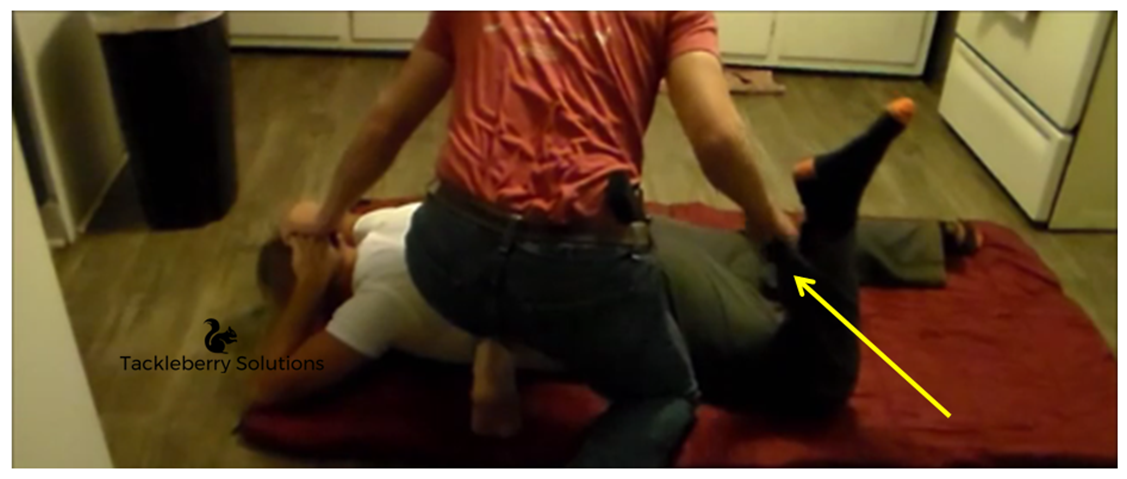
*Reminder* You want to be thorough. Don’t hesitate to credit card the dud to make sure they haven’t squirreled away something in the butt cheeks. You want to make sure he has absolutely NOTHING on him that God didn’t give him.
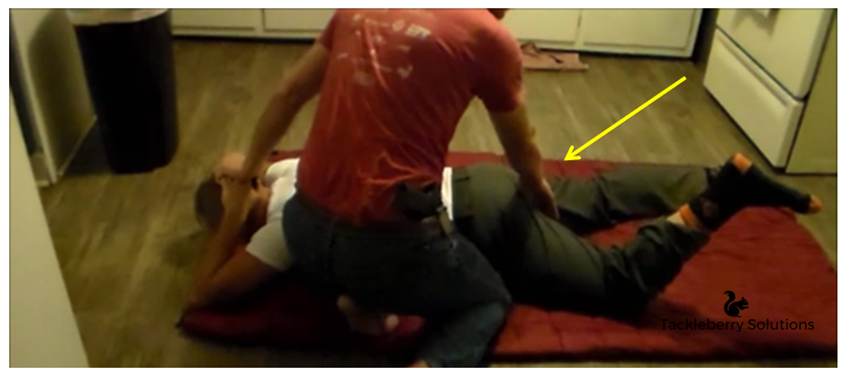
Now you’ve got to roll them over so that you can search their front. You start by lying down directly on top of them.
*Reminder* Keep their hands secure!*
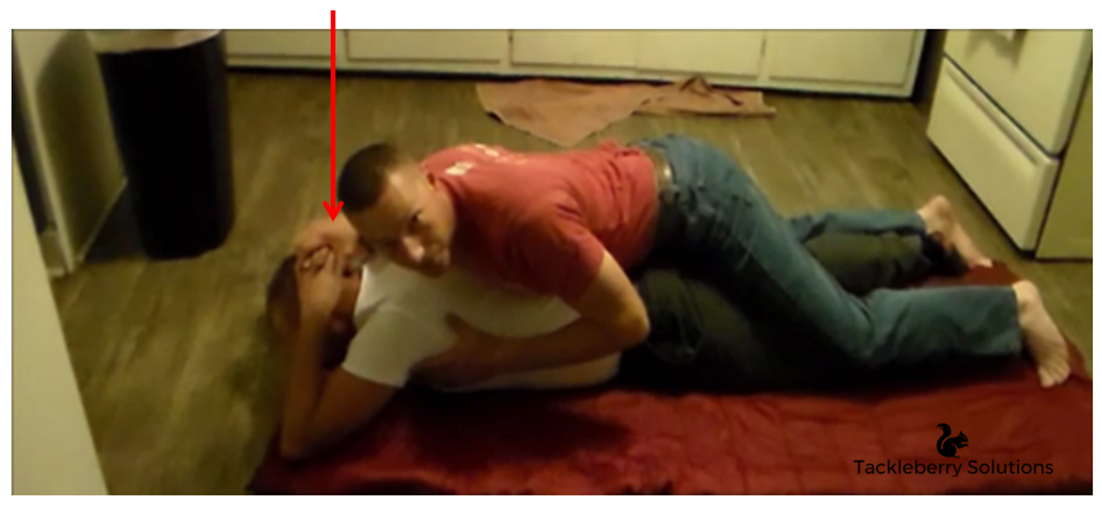
This is done as a precaution to ensure that they don’t have an S vest in the front (although you should have already picked up on that by now.)
Pull him over on his side by grabbing his belt and making him roll with you.
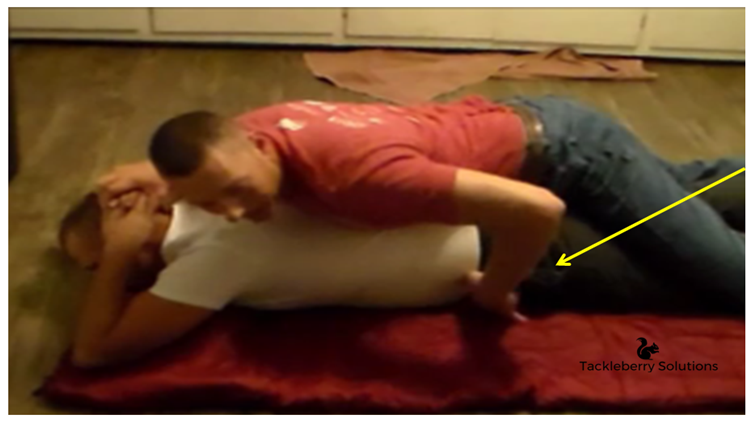
You want to conduct the roll over on the side that your overwatch can see what is on the other side of him.
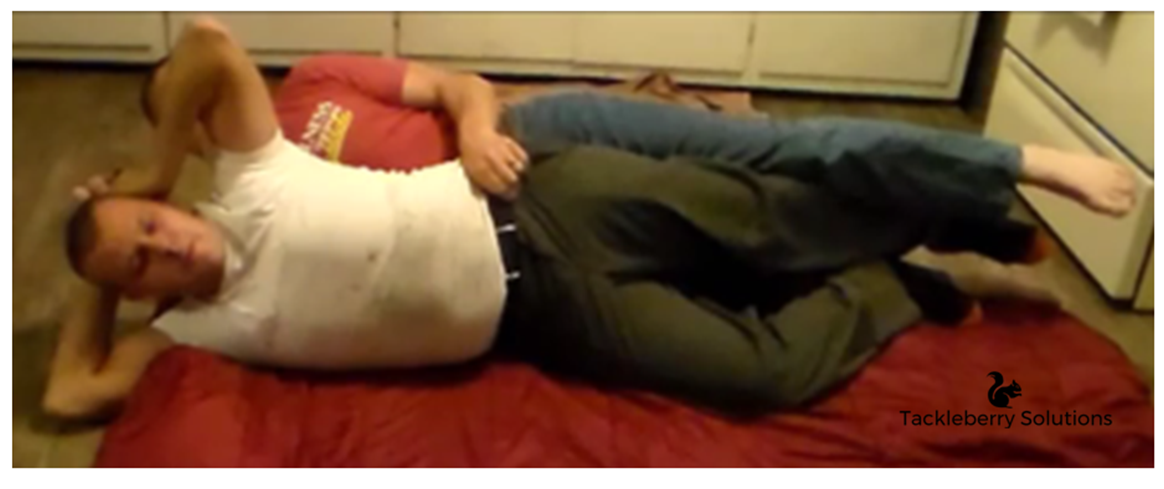
Place one knee on their side so that you can use it to push off of them if for some reason they get their hands loose. Use one hand to complete your search on the front.
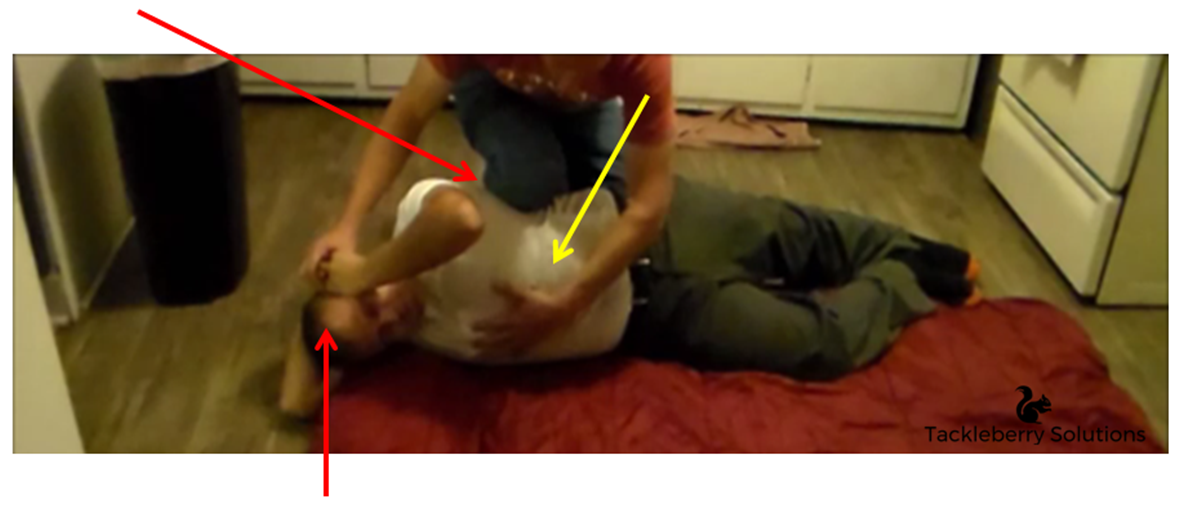
The other hand still has control over their fingers.
This is where you double check everything you searched from the back. Go back over the sides and around the belt (both inside the pants and in between the pants.) There is a chance that you missed something. This is another common place to hide weapons. If you don’t get a handful of nuts (nasty, I know) when you do your search, then you’re not doing it right.
Pay close attention around the groin and in between the legs.
This is another common place to hide weapons. If you don’t get a handful of nuts (nasty, I know) when you do your search, then you’re not doing it right.
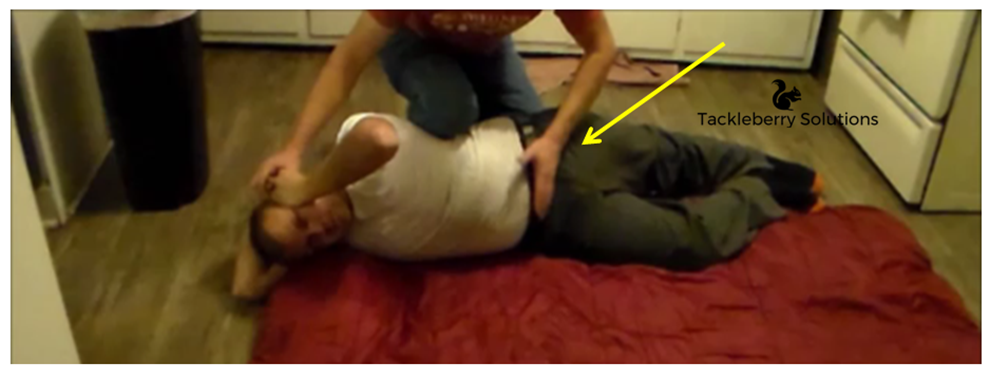
When you work your way down the legs, you will re-search their calves.
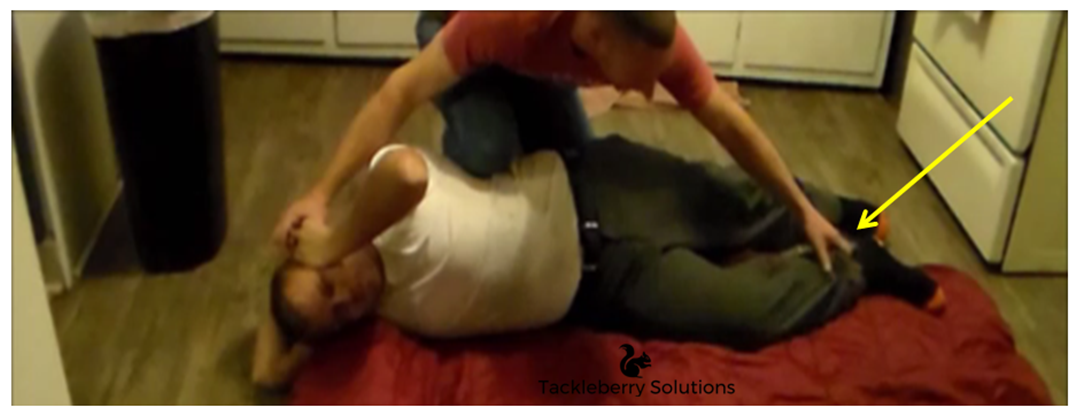
Roll them back onto the stomach so that you can cuff them.
Go back to straddling their sides. The other hand still has control over their fingers.
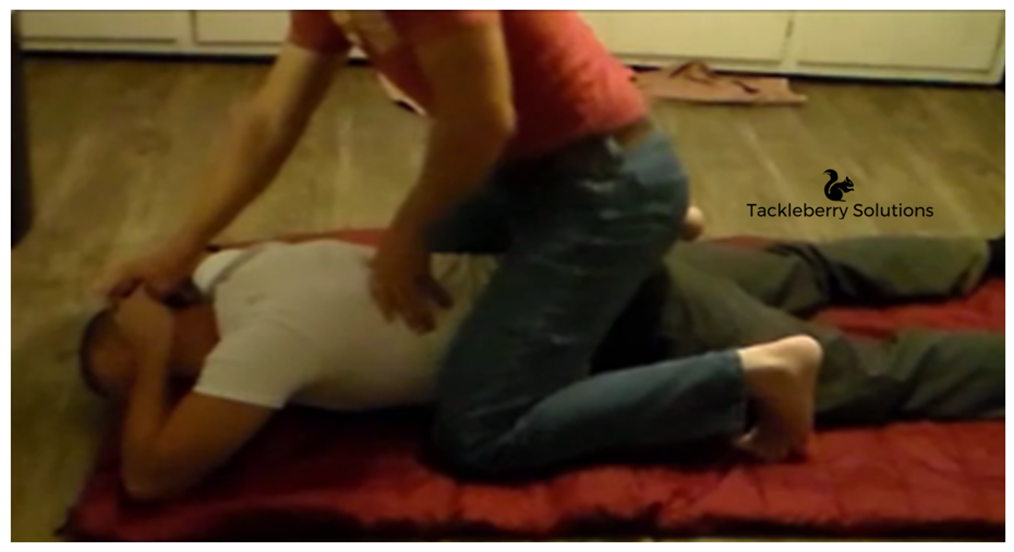
It doesn’t matter what types of handcuffs or restraints you are using, be VERY careful when you attempt to do this.
Grab one hand with your thumb facing away from their thumb (while your other keeps their other hand secure)
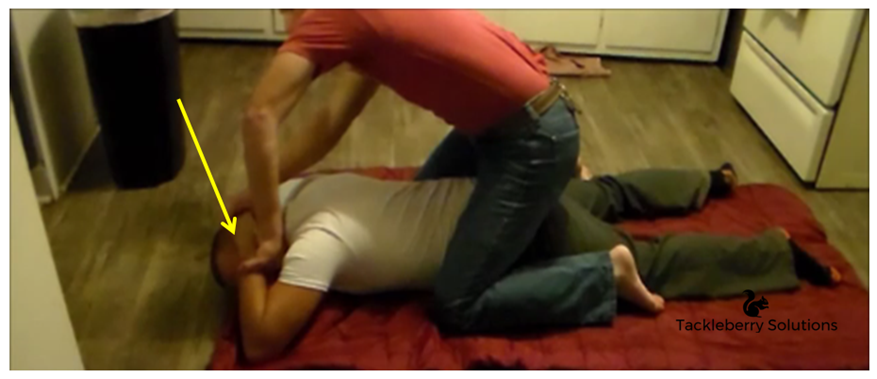
Bring their arm around and behind their back.
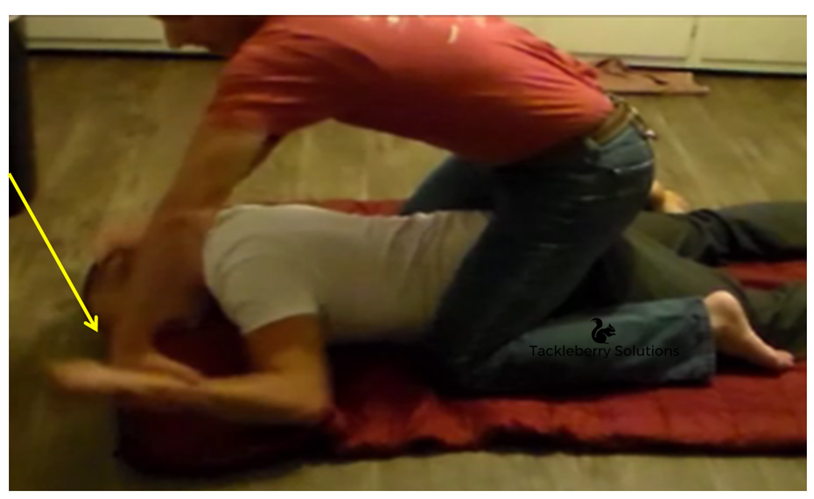
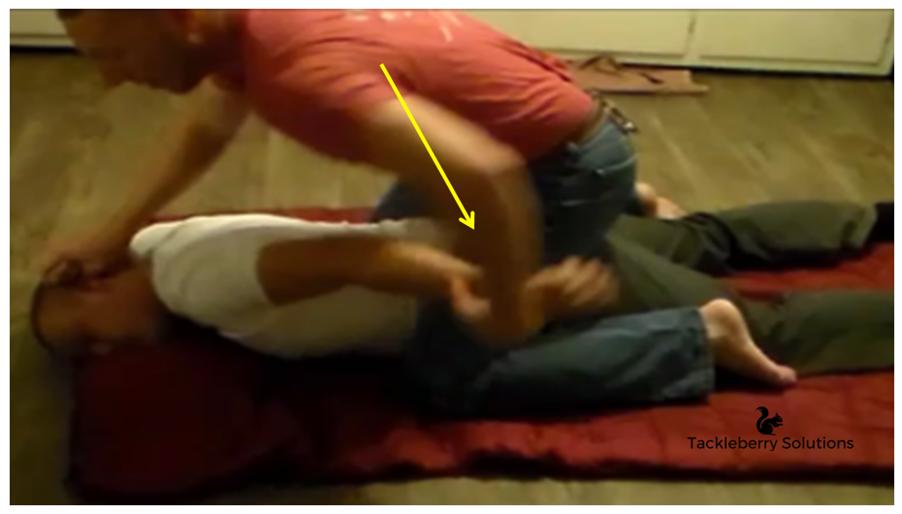
Now you can rotate your wrist so that you can bring their other arm to their back.
Their thumb needs to be facing the sky.
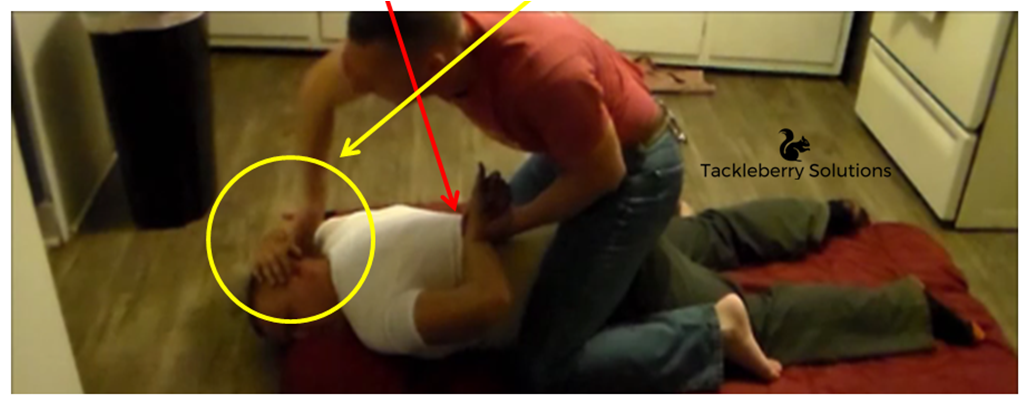
By placing the thumbs facing upwards, and together, you can easily control them by grabbing both thumbs at the same time with one hand (this should even be slightly uncomfortable for your POW).
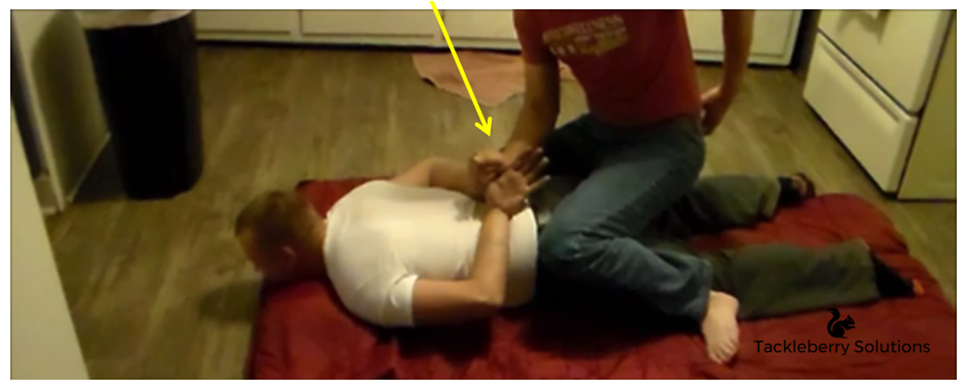
Slightly straighten their arms out and use your other hand to place the cuffs around their wrists.
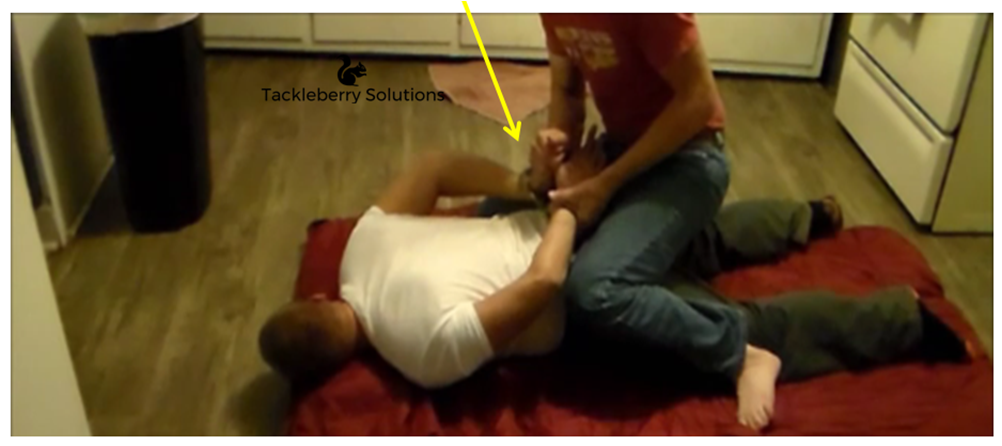
Now you’re going to roll them onto their side so that you can stand them up.
Do this by grabbing their shirt collar and their belt.
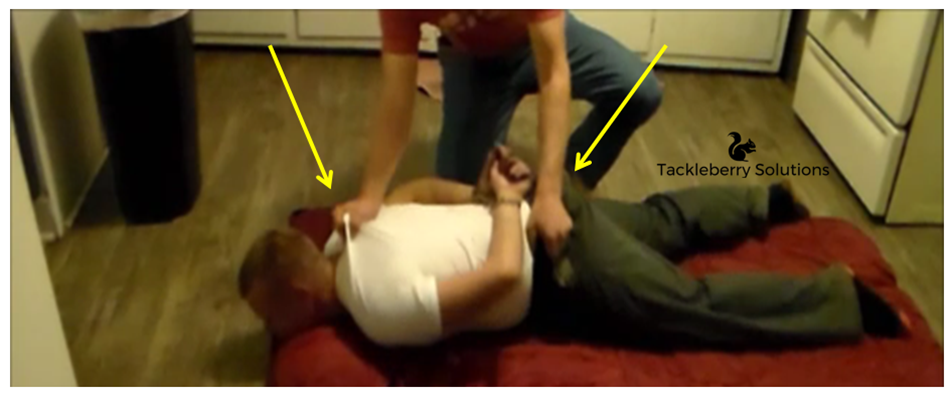
Then have them bring their knees to their chest.
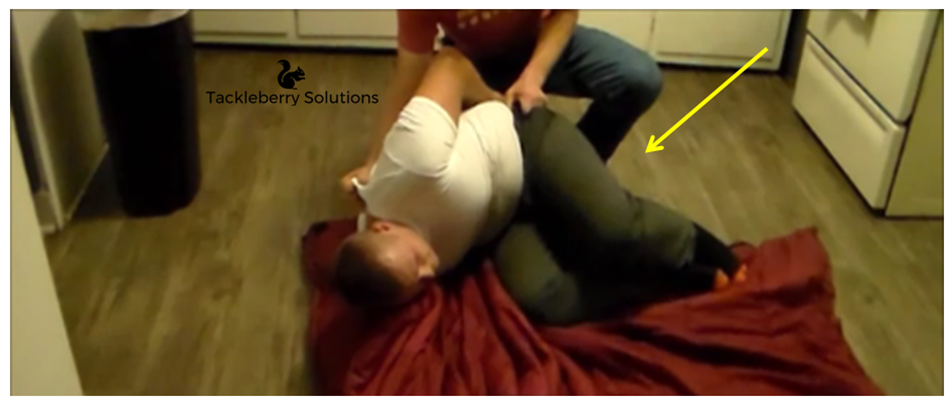
Sit them up so that they can get their feet under them to stand up.
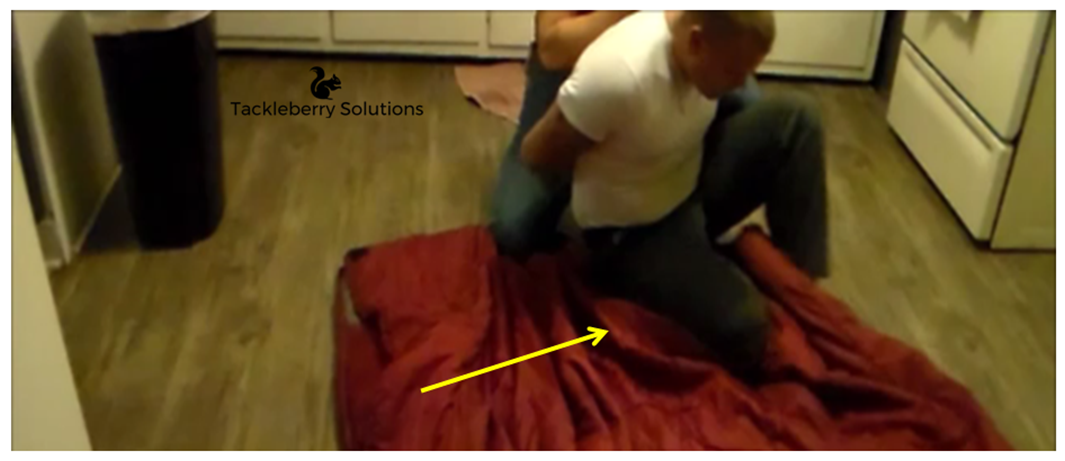
Now you can escort them to wherever it is you need to go.
Do this being keeping a firm hand on their wrist.
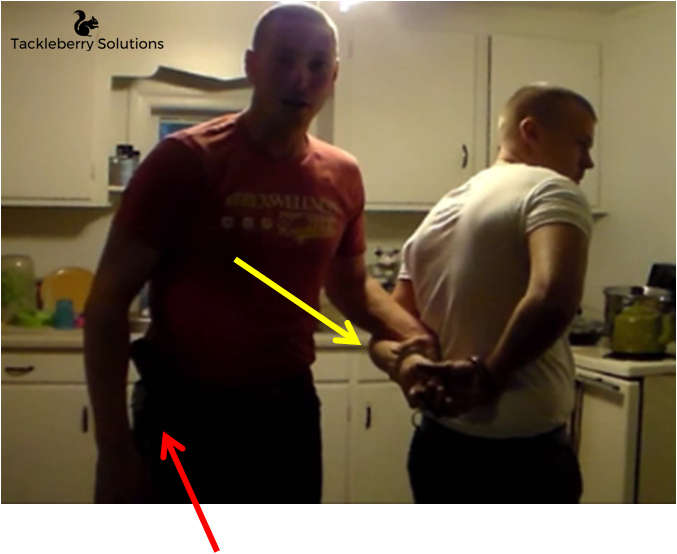
Keep your pistol hand free at all times so that you can easily draw it if you need to.
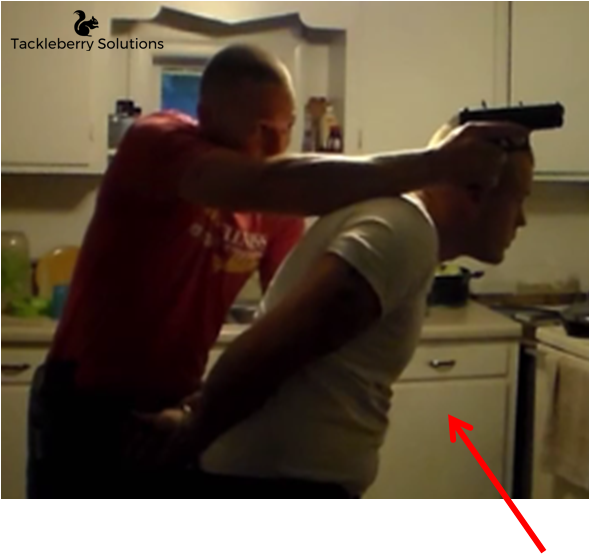
You can also use your POW as a human shield if you need to.
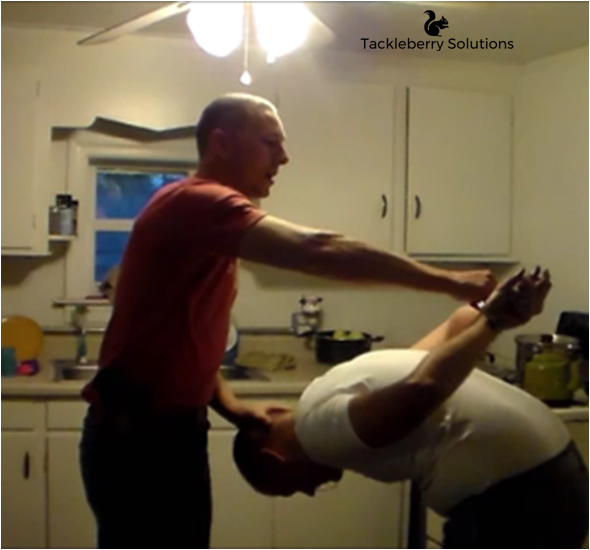
If they start to cause you problems, you can pull their wrists up, causing them to bend over.
You can also knee them in the stomach.
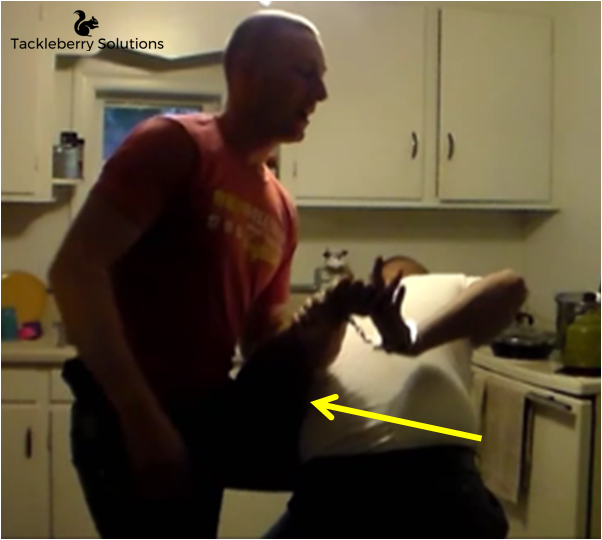
Or strike them in the back of the head (careful, this can be lethal.)
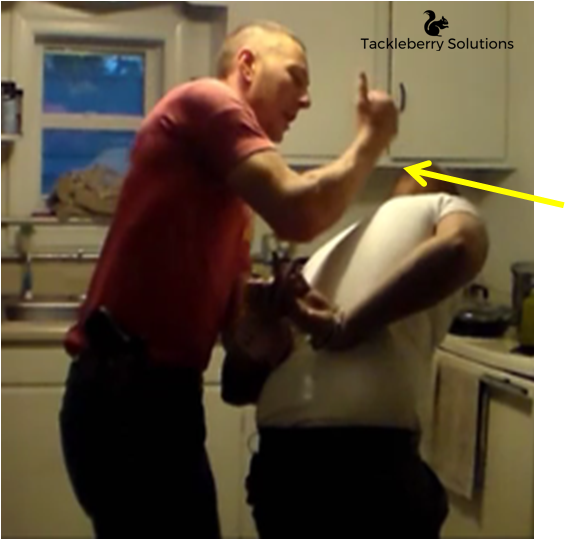
If they are a real pain in the butt, you can turn them around and push their head down while pulling up their wrists.
This forces them to walk backwards. It also stops them from spitting on you (diseases spread that way.)
There are 3 vital things you need to do once you secure a POW.
- Prisoners of War
- Remove their Shoes
- Cuff/Tie their hands
- Blindfold
When you go to blindfold them, a pillowcase is very useful. Not only does it cover their eyes, but it prevents them from spitting, or biting you.
If you’ve got to transport them through a hostile area, you need to duct tape their mouth as well. The first chance they get, they will yell out and get you shot.
Once you’ve handed them off to the EPT, they will search them again. Then when you get the prisoners of war to their holding area, they need to be searched again. Prisoners of War need to be searched a minimum of 3 times before they are ever interrogated. Don’t ever take the chance not to, you WILL miss something.
*Important Note* Have your medic check bandaged areas to ensure that there is actually a wound there – bandages are commonly used as a hidden pocket by those that are sneaky enough.
How to Rescue Prisoners of War
Stockholm's Syndrome- After a long period of time in captivity, prisoners of war may feel as if they belong in this new environment. A rescue op may be seen as another kidnapping and may trigger violence from the hostage in efforts to “not be taken, AGAIN”.
Dead Weight- POW may be disabled or unresponsive. Be prepared to carry prisoners of war out on your shoulder or by other means.
Preventative Measures- Secure friendly rescued prisoners of war the same way that you would an enemy POW. Don’t take the chance until you're in a safe environment. Eyes, hands, feet secure them all.
Confirm your target (are you saving the person you are looking for?)- Ask questions if possible. Name, DOB, birthplace, rescue code name/color. DO NOT ask questions about their mission or current location of their family, friends, fellow comrade in arms, etc. This will be viewed as an interrogation tactic and cause them to mistrust you. Use an updated picture to help ID. If POW was “interrogated” this may NOT help as their face may not be recognizable.
Up Next - How to Remove the Injured from Battle
Now that you've learned about how to handle prisoners of war - it is time to learn how to remove the injured from battle. Click here to read the next article.
Definitions/Terms
2-3 Second Rushing- “I’m up, he sees me, I’m down.” That what you say to your self as you run from one cover/concealment location to another. This is done so you can advance or retreat without getting shot. By the time the enemy gets his sights on you, you’re hitting the ground. Then your buddy jumps up and runs.
360 Security- Always maintain the ability to fire and scan in every direction. The fewer men you have, the more vigilant they must be in monitoring their sector of fire.
AUW – Advanced Urban Warfare are advanced tactics for fighting within an urban environment.
Baseline of Fire- a position usually formed by the Alpha team. All members come and form a line facing the enemy. Remember to keep 360 security. Then they use suppressive fire to keep the enemy heads down and attention on.
Bound and overwatch- One soldier shoots with suppressive fire while the other advances onto the enemy’s position, or retreats from their position. Often using 2-3 second rushing.
Breaking contact- basically you realize that you have bit off more than you can chew and wanta get the hell out of there alive. There are formations and tactics to do this properly. Bound and overwatch, Auzzy Peel, and Rolling Peel.
Casualty Collection Point- Predesignated location just outside the contact area of a raid sight, or locations along the route of travel, in which you will collect your wounded for treatment and stabilization for movement to a medical facility. Can also double as rally point.
CCT- Casualty Collection Team. A small team that usually consist of 3-4 guys that collect the dead or wounded during the fight. This is seen more often in AUW (Advanced Urban Warfare).
Choke Point – This is much like a fatal funnel, it is an area that you have no choice but to go through due to the natural terrain features. Example: a bridge over a large river.
Commo - communications
Concealment- A position behind an object that cannot stop bullets or fragmentation, but can act as a visual block. (i.e. tall grass)
Convoy - A group of vehicles traveling in the same direction for the same purpose.
Cover- A position behind an object that can stop bullets, fragmentation, and visual contact. (i.e. Rock)
cross-load ammo – This is like socialism, but with ammo. You will compile all of your ammunition and distribute it equally. This is typically done after a firefight.
Direct Fire- Precision incoming fire. Think J-Dam off a F-15 or rifle fire.
Dismounts – Men that get out of the vehicle and push forward on foot to either engage the enemy or clear an obstacle.
EPT- Enemy Prisoner Team. Similar to the CCT, but not as caring. They secure and search the POW again and move them (wounded or not) to the POW security point for yet another search, treatment, and evacuation for further interrogation. CCT can double as EPT.
Far Ambush- an attack that is outside of hand grenade range.
Fatal Funnel – This is like a choke point. It is an area that gives you no choice but to go through in which you have no option to go left or right. The only way out would be to push forward or go backwards.
Flanking- Moving toward the blind side of the enemy to gain tactical advantage.
FLIR Imagery – This is an advanced thermal optic used by drones and other aircrafts to spot personnel, weapon cashes or anything else that gives off a heat signature. This is very difficult to avoid.
Force on Force Training - Split your platoon in half and have one side defend, while the other side attacks. Be sure to use actual projectiles such as air soft, paint ball, or SIM rounds.
Formation- A specific placement of men to gain maximum tactical advantage.
Forward Operation Base (FOB) – Is a city within a city. Much like a standard military base here in America. Just this base is totally geared for war. Round the clock guards, stationary and roaming, TCP, etc.
Grenadier - Is the guy that carries the grenade launcher and grenades. Second most important weapon system in a fight. Can cause mass casualties with only one shot.
Indirect Fire- incoming fire that is from an arial weapon. Think artillery, mortars, or grenade launcher.
Intervals – distance between each person
KIA- killed in action.
KISS – Keep it simple stupid
Lift and Shift- A command given by team leader to fire high and away from your approaching troops. This keeps enemy’s heads down without hitting friendly forces.
Limit Of Advance – When advancing through an objective, this is an area where you stop your assault.
L-Shape- L shape ambush is when you literally place your men in a form of an L and let the enemy walk into your cross fire. With this shape, there is no way you can hit each other. But your enemy has nowhere to go and is getting hit from what seems like all sides.
LT – Lieutenant, the lowest rank that a commissioned officer can hold in the military. In my experience they are usually “GOOD IDEA” fairies and cost you more sleepless night and pain than any one else.
LOA- Limit of Advance. Tells the men in your section to stop movement, and commander of other section to start their assault.
LZ – Landing Zone for an aircraft.
Murphy’s Law – An old army wise tale. Anything that can go wrong will go wrong, it’s Murphy’s law.
NCO – Non-commissioned officer, where the rubber meets the road, the backbone of the military. The guy that puts foot to ass, trains the men, keeps them alive in a hot zone, and makes heroes out of LT’s.
Near Ambush- An attack that is within hand grenade range. I.E. I can throw a hand grenade and it kill the enemy.
Neighborhood Guardian – Is like the stationary or roaming guard. The watchdog of your community.
Package - A term used for the person/thing that is being protected or delivered.
Pat Tillman – Former NFL player that joined the Army Rangers after 9/11. Was killed in action during a firefight in Afghanistan. Stood up from behind cover in front of his team and was hit by friendly fire.
Platoon – Is a group of men that comprise of two sections of about 6 soldiers. They are headed by the platoon Sergeant and Lieutenant.
Platoon Leader Recon- when the LT, Senior, and a radio guy move forward to observe the objective while leaving the main body behind . This is done to prevent too much noise from excessive movement.
Point Man – The man that is at the front of your formation, this is typically a sniper.
POW- prisoner of war.
Prone - The most stable firing position and the safest during a firefight. Just lay down.
precision fire – Shooting carefully to aim and actually hit the target instead of just spraying lead.
QRF (Quick Reaction Force) – Modern day minutemen. You can also think of them as emergency responders during war.
Rally Points - Predesignated location for your men to fall back to. This would be used as a gathering point after a raid, breaking contact, or that one member that gets separated from the group. Can also be used as check points along the route of travel to ensure you are on course.
Ranger File – Think ducks in a row. Walking in a single file line. This is used in areas with thick under brush.
Reaction to contact – Reacting to enemy shooting at you. Depending on the situation, you will react a certain way.
RPK – Russian version of a squad automatic weapon, typically carried by their machine gunners.
Sector of Fire- The area in which you are responsible for and have free range of engagement.
Sig acts – Significant activities within the last 24 hours. Firefights, enemy activity, etc.
SLLS - Pronounced Seals, stands for Stop, Look, Listen, Smell. Basically just be observant, you might just find something.
Sniper- an enemy sharp shooter that uses concealment to hide their position while delivering procession fire on enemy.
Stationary Guards – Guards that sit in one location observing their sector of fire.
Stockholm's Syndrome- A state of mind prisoners can develop in which they sympathize with their kidnapper and no longer try to escape.
Suppressive Fire- one round a sec. This is designed to keep the enemy’s head down while your other section advances onto their position.
S vest - Suicide vest. A vest that is rigged with explosives, designed to be worn by individuals willing to blow themselves and others up .
TC - Truck or Track Commander
Thermal Sighting Imagery – Optic system used to see day or night based upon your body’s heat. Does not work through glass or any kind of obstruction. Also faulty in the desert at high noon as everything is hot.
Triage – This is where you assess the wounded in mass amounts so that you know who to treat first that have a better chance of living.
Train to Failure – Train as if everything is failing you. Radios die, weapons jam, no support, medic is dead, etc.
Victim Detonated – Basically a booby trap that is detonated by the victim themselves be it via trip wire, thermal imagery, pressure plate, etc.
VIP - Very Important Person
Wedge Formation - Formation used when in the open. Designed to look like a wedge. Gives you more of a chance of surviving a sniper ambush.
Side note: When you get into contact with the enemy just yell out your commands. The enemy knows you’re there anyways. Be sure that the command is repeated back to you by the rest of the group. This is to ensure they understood the order and to give anyone that didn’t hear it a second chance at hearing the order. Furthermore, dig deep, grab your balls and sound off. Use your man voice. When all hell is breaking out around you and guys are dying, no one is going to hear or listen to you if you sound like freaking Mickey Mouse.


thank you very much ,greetings from Greece